
Introduction to Spooky Spider Cookies
Halloween is just around the corner, and what better way to embody the spirit of this spooky season than with delicious spooky spider cookies? These delightful little treats not only capture the essence of Halloween with their creepy-crawly decor, but they're also incredibly fun to make, especially if you're hosting a gathering or want to surprise your colleagues at work.
But let's be real—spooky treats don’t have to be reserved solely for Halloween. These cookies are perfect for any time you want to add a touch of whimsy to your dessert table. Imagine hosting a birthday party or a casual get-together and pulling out a batch of these adorable spooks. Your guests will be charmed, and you’ll be known as the creative host who knows how to have fun with food!
Plus, they are surprisingly easy to whip up, making them a fantastic option for young professionals who are short on time but still want to impress.
So, grab your ingredients and get ready to dive into the delicious world of spooky spider cookies. Feeling inspired? Let’s explore just how simple it is to create these monstrous yet incredible treats! You’ll find the full recipe below, but first, let’s talk about how these festive cookies can fit into any occasion.

Ingredients for Spooky Spider Cookies
Essential ingredients for the dough
Creating spooky spider cookies begins with your basic cookie dough foundation. Here’s what you’ll need:
- ½ cup shortening: This adds a tender texture.
- ½ cup peanut butter: Perfect for a delicious, nutty flavor.
- ½ cup packed brown sugar and ½ cup white sugar: For the ultimate blend of sweetness.
- 1 large egg, beaten: This helps bind the dough.
- 2 tablespoons milk: A splash to keep your cookies soft.
- 1 teaspoon vanilla extract: Because vanilla makes everything better!
- 1 ¾ cups all-purpose flour: The structure of your cookie.
- 1 teaspoon baking soda and ½ teaspoon salt: For leavening and balance.
For the rolling of the cookies, don’t forget ¼ cup of white sugar to give them that irresistible sparkle.
Fun additions for decoration
Now, let’s get creative! The magic really happens with the decorations that turn ordinary cookies into spooky spiders:
- 24 chocolate candy spheres (like Lindt Lindor Truffles): These will be the bodies of your spiders.
- 48 decorative candy eyeballs: Spooky and fun, they bring your spiders to life!
- ½ cup prepared chocolate frosting: To hold everything together and create those creepy legs.
Want even more ideas? Check out Food Network's Halloween treats for inspired decorations!
Preparing Spooky Spider Cookies
Creating delicious and eye-catching spooky spider cookies is not just a treat for your taste buds but also a fun and engaging activity in the kitchen. Perfect for Halloween parties or just a festive evening indoors, these cookies will bring out your inner baker. Let’s dive into the steps together!
Preheat the Oven
Begin your baking adventure by preheating your oven to 375 degrees F (190 degrees C). This temperature is perfect for achieving golden-brown cookies. While the oven is heating up, line your baking sheets with parchment paper, making it easy to remove the cookies later on. If you’re curious about the benefits of using parchment paper, check out this article on baking tips.
Make the Cookie Dough
In a large mixing bowl, you’ll want to beat together ½ cup shortening, ½ cup peanut butter, ½ cup brown sugar, and ½ cup white sugar using an electric mixer until the mixture is beautifully smooth. Adding in the beaten large egg, 2 tablespoons of milk, and 1 teaspoon of vanilla extract will create a creamy, dreamy texture. Combine all these ingredients until thoroughly mixed—this is the foundation of your spooky spider cookies.
Shape and Roll the Cookie Balls
In a separate small bowl, mix 1 ¾ cups of all-purpose flour, 1 teaspoon of baking soda, and ½ teaspoon of salt. Then, gradually add this dry mixture to your peanut butter blend, stirring until you’ve formed a soft dough. Now, it’s time to get your hands a little messy! Divide the dough into 48 small balls. To make them extra special, roll each ball in ¼ cup of white sugar to create a delightful coating.
Bake the Spooky Cookies
Arrange your sugar-coated dough balls on the prepared baking sheets, leaving enough space between them (about 2 inches apart to allow for spreading). Pop them into your preheated oven and bake for 10 to 12 minutes or until they turn golden brown. As they bake, your kitchen will begin to smell heavenly! Once done, remove the cookies and press the blunt end of a wooden spoon into each cookie to form a slight dimple, which will hold your chocolate sphere later.
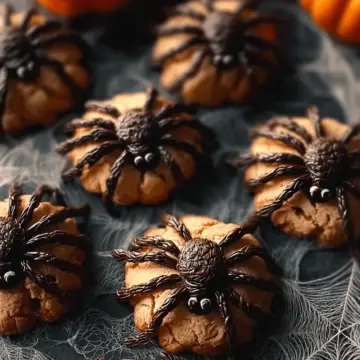
Decorate with Chocolate Spheres and Candy Eyes
Once your cookies have cooled on the baking sheets for about 10 minutes, it’s time for the fun part—decorating! Cut 24 chocolate candy spheres into two hemispheres and place one piece on each cookie with the rounded side facing upwards.
Use ½ cup prepared chocolate frosting in a pastry bag (or a snipped plastic bag) to create your spider legs and to stick on 48 decorative candy eyeballs. This adds an adorable touch that will delight both kids and adults alike. Allow the frosting to harden at room temperature for about 30 minutes, and then store your delightful spooky spider cookies in an airtight container.
Baking these cookies is sure to add joy to your Halloween celebrations, so gather your friends, roll up your sleeves, and enjoy the sweet rewards of your efforts!

Variations on Spooky Spider Cookies
Gluten-Free Spooky Spider Cookies
Who says those on a gluten-free diet can’t join the fun? You can make delicious gluten-free spooky spider cookies by substituting the all-purpose flour with a 1-to-1 gluten-free flour blend. Just be sure that it includes xanthan gum to help maintain that chewy texture we all love. Many gluten-free blends are available—brands like Bob’s Red Mill and King Arthur Flour often come highly recommended. Your creepy cookie creations will be a hit with everyone!
Vegan Spooky Spider Cookies
Going vegan? No problem! To create delightful vegan spooky spider cookies, replace the egg with a flaxseed or chia seed egg (1 tablespoon of ground seeds mixed with 2.5 tablespoons of water). Use coconut oil or a plant-based butter alternative in place of shortening and make sure your chocolate candies and frosting are vegan-friendly. It's easy to swap in ingredients that keep the spirit of Halloween alive for everyone at your party! Happy baking!
For even more inspiration, check out resources like Minimalist Baker for additional vegan baking tips!
Baking notes for Spooky Spider Cookies
Common mistakes to avoid
When making these spooky spider cookies, be cautious not to overmix the dough after adding the flour. This could lead to tough cookies instead of the soft, chewy texture we love. Additionally, ensure your oven is properly preheated. Baking at the wrong temperature can result in unevenly cooked cookies. Lastly, don’t forget to let the cookies cool before adding the chocolate spheres and eyeballs—this will help everything stick better.
Tips for perfect texture
For the ideal texture of these spooky spider cookies, consider using room temperature ingredients. When your butter and eggs are at room temperature, they mix more seamlessly, leading to a fluffier cookie. Also, rolling the dough in sugar gives a delightful crunch on the outside while keeping the inside soft. And remember, when you press down the chocolate spheres, do it gently to keep the cookies from flattening. Little tips like these make a big difference!
For deeper insights into cookie baking, feel free to check out resources from America's Test Kitchen or Serious Eats!

Serving suggestions for Spooky Spider Cookies
Creative ways to present spooky cookies
Transform your spooky spider cookies into an eye-catching centerpiece at your Halloween gathering. Consider filling a black cauldron with colorful popcorn or Halloween candy, creating a festive landscape for your cookies. Place each cookie atop a small pumpkin or decorative plate for an extra touch. To enhance the eerie vibe, use a spooky tablecloth or backdrop, adorned with fake cobwebs and plastic spiders. This not only makes for a visually striking display but also sets the perfect ambience for a night of fun and fright!
Pairing suggestions for your Halloween party
While your spooky spider cookies steal the show, consider offering tasty accompaniments that complement their sweet and salty flavors:
-
Pumpkin Spice Lattes: A warm beverage that pairs perfectly with cookies and brings seasonal cheer.
-
Hot Apple Cider: This comforting drink enhances the cozy vibes of fall gatherings.
-
Fruit Punch: A fruity, non-alcoholic option that appeals to all ages.
-
Veggie Platter: Balance out the sweetness with a crunchy assortment of carrots, celery, and pepper strips for a healthier choice.
For more creative ideas, check out resources like Food Network for drink pairings that could enhance your Halloween spread!
Tips for Making Perfect Spooky Spider Cookies
Key Ingredients for Success
To create the best Spooky Spider Cookies, you should focus on using high-quality ingredients. Choose creamy peanut butter for a smooth texture and opt for fresh, flavorful chocolate candy spheres. Using an airtight container for storage is essential to maintain their freshness. If you're in the mood for a twist, try experimenting with different flavored frostings for the spider legs – the options are endless!
Tricks to Ensure Even Baking
For perfectly baked cookies, ensure your oven is preheated to the correct temperature. Use parchment paper for a non-stick surface, and rotate your baking sheets halfway through to avoid uneven baking. Keeping the dough cool before baking helps maintain shape, which is particularly important for those cute spider shapes! For more tips on baking, check out King Arthur Baking.
Following these tips will help you create the perfect spooky spider cookies that are both delicious and visually appealing!
Time Details for Spooky Spider Cookies
Preparation Time
Gathering your ingredients and whipping up the dough takes about 15 minutes. This is the time to get your kitchen organized — the more efficient you are, the more fun cooking becomes!
Baking Time
Slip those delightful cookie balls into the oven for 10 to 12 minutes to achieve the perfect golden finish. Keep an eye on them; you want that crispy exterior but soft inside.
Total Time
All in all, you’re looking at around 40 to 45 minutes from start to finish, including cooling time before decorating. It’s quick, easy, and oh-so-rewarding! If you're hosting a gathering, these spooky spider cookies are sure to be the star of the show.
For more tips on cookie baking, check out Serious Eats, which provides a great overview of baking fundamentals!
Nutritional Information for Spooky Spider Cookies
Calories per Cookie
Each Spooky Spider Cookie has approximately 120 calories, making it a delightful treat without derailing your daily calorie goals. If you're looking to indulge without overindulging, these cookies strike the right balance!
Sugar Content
Crafted with a blend of brown sugar and white sugar, each cookie contains about 9 grams of sugar. While they’re sweet enough to satisfy your cravings, you might want to enjoy them in moderation—especially if you’re watching your sugar intake.
Protein Values
Thanks to the peanut butter and egg in the recipe, you’ll find each cookie offers roughly 2 grams of protein. This little boost can help keep you feeling full and satisfied, making these cookies more than just a sugary snack.
For more nutritional insights, consider checking out resources like the USDA FoodData Central for detailed information on various ingredients.
FAQs about Spooky Spider Cookies
Can I make these cookies ahead of time?
Absolutely! You can prepare the spooky spider cookies dough ahead of time. Simply shape the dough into balls, chill them in the refrigerator for up to 2 days, and bake when you’re ready to serve. For even longer storage, you can freeze the dough balls for up to three months. When you're ready to make them, just bake them straight from the freezer—no need to thaw!
How do I store leftover cookies?
To keep your spooky spider cookies fresh, store them in an airtight container at room temperature. They'll stay delicious for up to five days. If you’d like them to last a little longer, you can also freeze any leftovers. Just ensure they are well-wrapped to prevent freezer burn.
What if I can't find chocolate candy spheres?
If chocolate candy spheres are elusive in your area, fear not! You can substitute with any round chocolate candy, like chocolate-covered truffles or even peanut butter cups. Alternatively, you could make your own chocolate spider by using melting chocolate to form a sphere shape—great for a fun DIY twist!
Conclusion on Spooky Spider Cookies
In conclusion, these spooky spider cookies are not only a delight to make but also a hit at any Halloween gathering. With their playful design and delicious taste, your friends and family will love them. Whether for a party or just a fun treat, these cookies are sure to impress! Remember, baking should be fun, so feel free to unleash your creativity!
For more festive recipes and tips, check out sites like The Spruce Eats or Food Network. Happy baking!
Spooky Spider Cookies: Easy Halloween Treats Everyone Will Love
Equipment
- electric mixer
- baking sheets
- mixing bowls
- pastry bag
Ingredients
Cookies
- 0.5 cup shortening
- 0.5 cup peanut butter
- 0.5 cup packed brown sugar
- 0.5 cup white sugar
- 1 large egg, beaten
- 2 tablespoons milk
- 1 teaspoon vanilla extract
- 1.75 cups all-purpose flour
- 1 teaspoon baking soda
- 0.5 teaspoon salt
- 0.25 cup white sugar for rolling
- 24 pieces chocolate candy spheres with smooth chocolate filling, refrigerated until cold
- 48 pieces decorative candy eyeballs
- 0.5 cup prepared chocolate frosting
Instructions
Baking Instructions
- Preheat the oven to 375 degrees F (190 degrees C). Line baking sheets with baking parchment.
- Beat shortening, peanut butter, brown sugar, and ½ cup white sugar together with an electric mixer in a large bowl until smooth. Beat egg into the creamy mixture until fully incorporated. Stir milk and vanilla extract into the mixture until smooth.
- Mix flour, baking soda, and salt together in a small bowl; add to peanut butter mixture in the large bowl and stir until completely incorporated into a dough. Divide and shape dough into 48 balls.
- Spread ¼ cup white sugar into a wide, shallow bowl. Roll dough balls in sugar to coat and arrange about 2 inches apart onto prepared baking sheets.
- Bake in preheated oven until golden brown, 10 to 12 minutes. Remove cookies from oven and quickly press a dimple into the middle of each cookie using the blunt end of a wooden spoon. Cool cookies on sheets for 10 minutes before transferring to a wire cooling rack to cool completely.
- Cut each chocolate sphere into two hemispheres. Put one piece atop each cookie with the rounded side facing upwards.
- Spoon frosting into a pastry bag with a small round tip or a plastic freezer bag with one end snipped off. Dab a small amount of frosting onto the back of each candy eyeball and stick two onto each chocolate candy to resemble eyes. Then pipe frosting in four thin lines, starting at the base of the candy, on each side atop the cookie to resemble spider legs.
- Let frosting harden at room temperature, about 30 minutes. Store cookies in an airtight container.


Leave a Reply