
Introduction to Classic Vanilla Pudding
Homemade classic vanilla pudding is a delightful treat that transports you back to simpler times, where every spoonful is a reminder of comfort. Unlike the pre-packaged options, making it from scratch allows you to control the ingredients, ensuring a creamy, luscious dessert that’s free from odd preservatives. Say goodbye to artificial flavors and hello to the rich, authentic taste of real vanilla!
Why Homemade Vanilla Pudding is a Game-Changer
You might wonder, why go through the effort of making pudding when it’s so easy to grab a box at the grocery store? The answer is simple: flavor and texture. Homemade pudding is denser, creamier, and carries a much richer flavor profile. Plus, it's an opportunity to impress your friends and family with your culinary skills!
Here’s what sets homemade pudding apart from the rest:
- Ingredients You Trust: You know exactly what’s going in—from wholesome milk to pure vanilla extract.
- Customizable: Want to add a sprinkle of cinnamon or a dash of nutmeg? Your pudding, your rules!
- Satisfying Process: There’s something rewarding about stirring a pot of pudding on the stove, watching it transform into a velvety dessert.
If you're craving the comfort of homemade treats without the fuss, stick around for the full recipe! For more inspiration, check out Serious Eats for their take on classic desserts.
Ingredients for Classic Vanilla Pudding
Creating the perfect bowl of classic vanilla pudding starts with a few essential ingredients that contribute to its creamy, smooth texture. Here’s what you’ll need:
Essential ingredients for a creamy texture
- Whole Milk: This is the backbone of your pudding, providing richness and creaminess.
- Granulated Sugar: It sweetens the pudding perfectly, balancing the flavors.
- Cornstarch: The key thickening agent, cornstarch gives your pudding that luxurious consistency.
- Kosher Salt: Just a pinch enhances the sweetness and flavor profile.
- Unsalted Butter: Adds a smooth, velvety mouthfeel, enriching the pudding.
- Vanilla Extract: For that classic vanilla flavor that brings everything together beautifully.
- Vanilla Bean (optional): Adding a fresh split vanilla bean infuses a deeper, aromatic taste.
Optional toppings and garnishes
Once you've prepared your classic vanilla pudding, consider dressing it up a bit! Here are some delightful options:
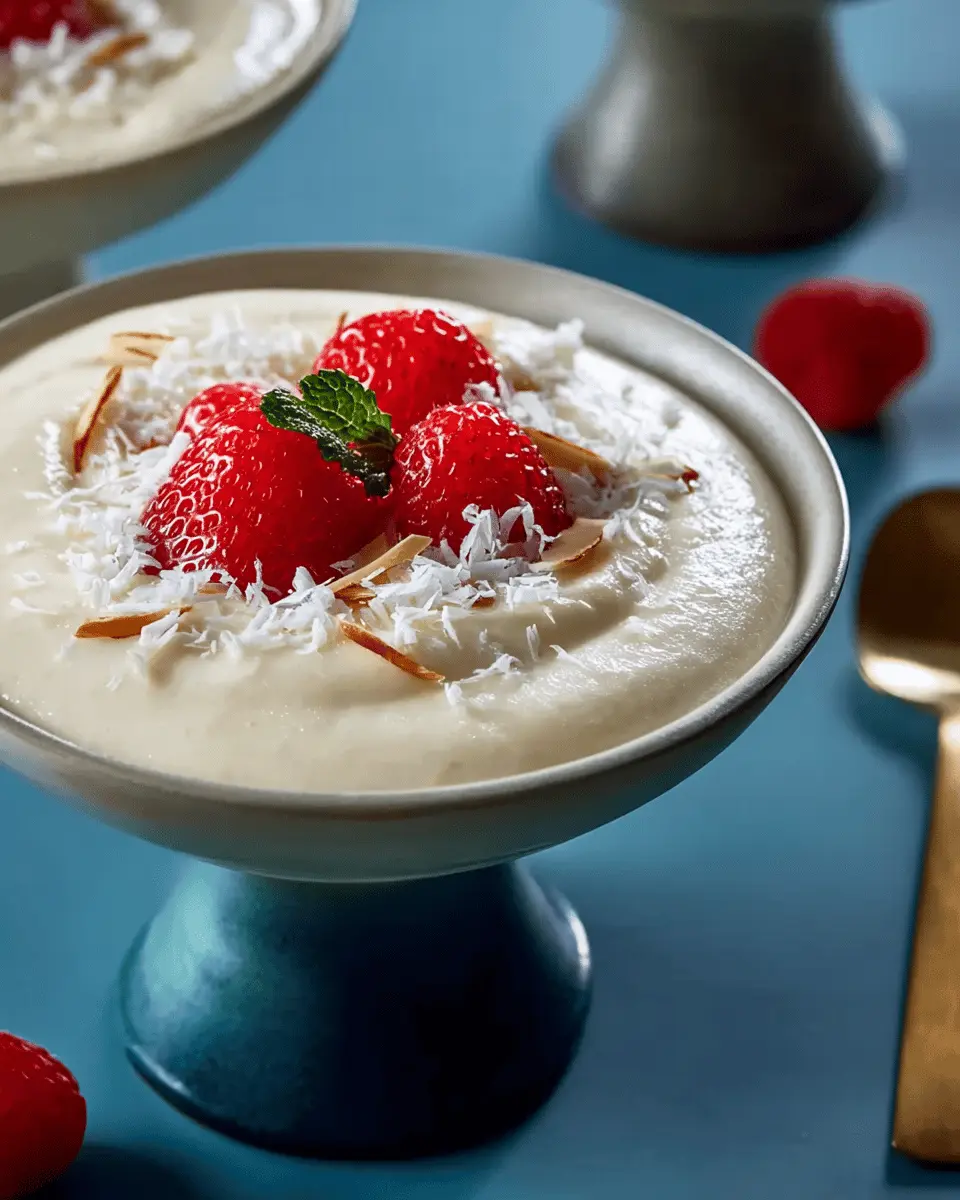
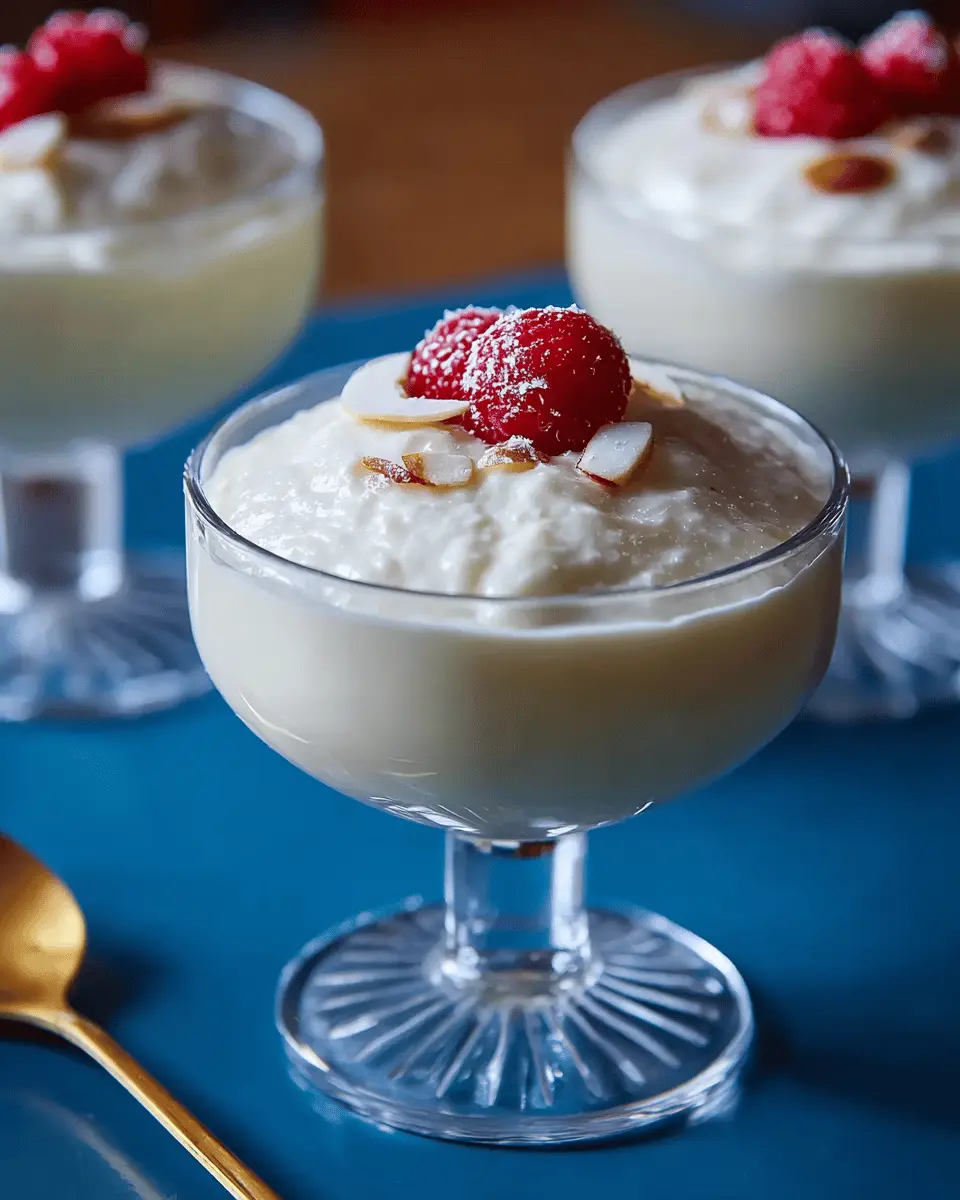
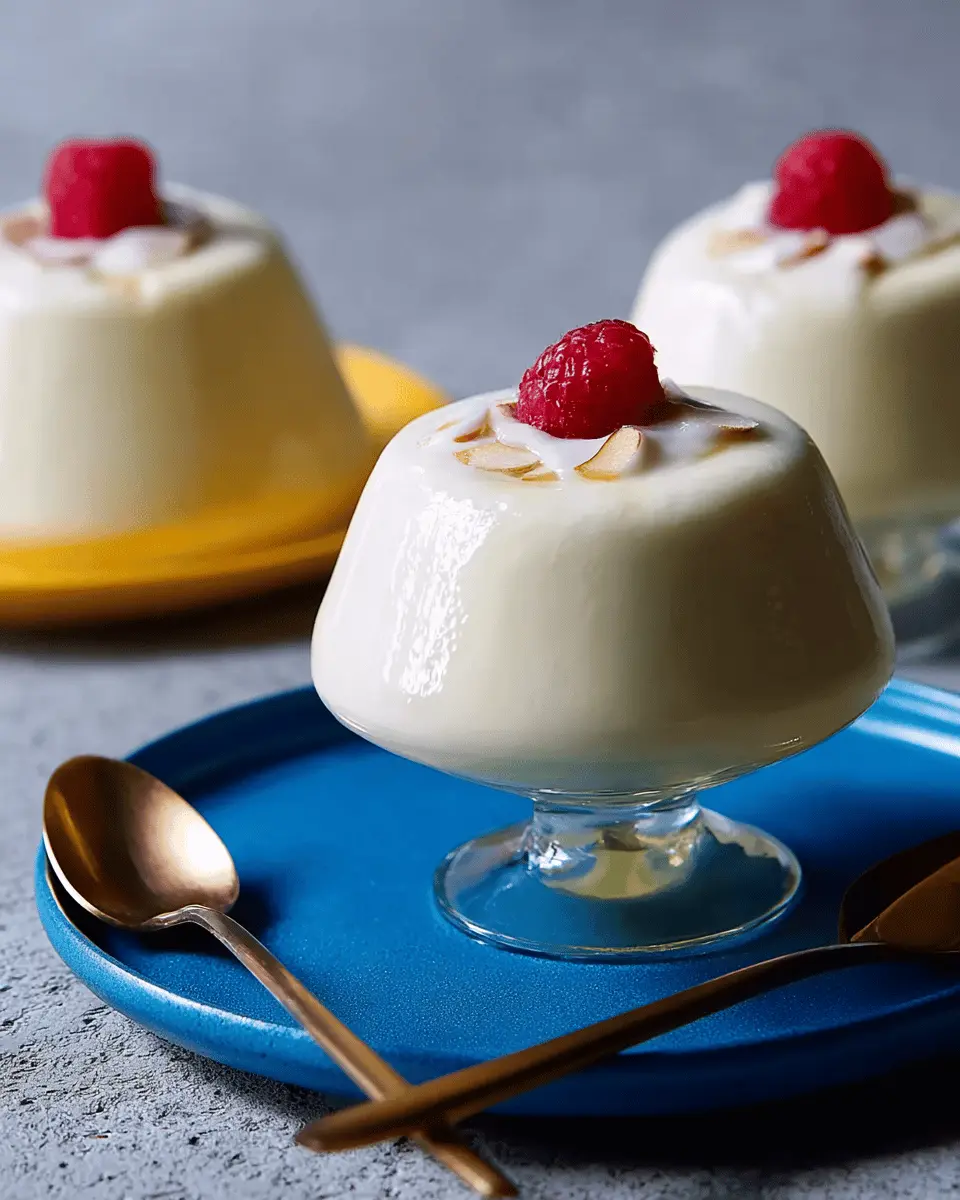
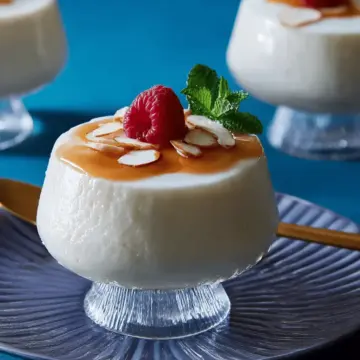
- Fresh Raspberries: Their tartness contrasts wonderfully with the sweet pudding.
- Sliced Almonds: For a bit of crunch and nuttiness, add these on top.
Feel free to explore more garnishing ideas; a dollop of whipped cream or some chocolate shavings can also elevate your dessert to the next level!
Step-by-step preparation of Classic Vanilla Pudding
Creating a delightful classic vanilla pudding at home is simpler than you think. So, grab your apron, and let’s walk through the process step-by-step. This comforting dessert will surely impress your friends and family.
Gather your ingredients
Before diving into the preparation, make sure you have everything you need. Here’s what you’ll require:
- 2 cups whole milk: The foundation of our creamy pudding.
- ⅓ cup granulated sugar: To sweeten things up a bit!
- 2 tablespoons cornstarch: This is essential for thickening.
- ¼ teaspoon kosher salt: Balances the sweetness.
- 4 tablespoons unsalted butter (2 ounces): For richness.
- 1 teaspoon vanilla extract: The star of the show!
- 1 (2-inch) piece vanilla bean, split lengthwise (optional): For those extra vanilla vibes.
You might also want to add a sprinkle of creativity with optional toppings like fresh raspberries or sliced almonds.
Mix the base ingredients
In a medium saucepan, combine your milk, sugar, cornstarch, kosher salt, unsalted butter, vanilla extract, and, if you like, the split vanilla bean. Use a whisk to mix everything until the cornstarch is fully dissolved. The resulting mixture should be smooth and velvety, setting the stage for our classic vanilla pudding. This is an excellent time to think about how you’ll serve it later on.
Cook the mixture on medium heat
Now, place the saucepan over medium heat. Keep whisking continuously for about 6 minutes. You’ll know you’re on the right track when the mixture starts to bubble. This is crucial because you want to ensure everything is well combined and heated evenly.
Thicken the pudding
Once it begins to bubble, reduce the heat to low. Continue whisking as you simmer the mixture for another 1 to 2 minutes. During this time, you’ll notice it thickening beautifully and taking on a glossy finish. This is the moment when your classic vanilla pudding transitions from liquid to that luscious, creamy texture we all crave.
Chill the pudding
After thickening, carefully transfer the pudding to a medium bowl. To prevent a skin from forming on the surface, lay a piece of plastic wrap directly on top of the pudding. Refrigerate for at least 2 hours to chill and set. Patience is a virtue here; your effort will be rewarded!
Whisk and serve
When you’re ready to indulge, remove the vanilla bean piece (if you used it) and give your pudding a quick whisk to smooth it out. Divide it into two delightful bowls and, if you fancy, garnish with fresh raspberries and sliced almonds. Now, you’re all set to savor your homemade classic vanilla pudding!
For more delicious dessert ideas, check out Bon Appétit. Enjoy your sweet creation!
Variations on Classic Vanilla Pudding
Vanilla Pudding with Fruit
Elevate your classic vanilla pudding by adding fresh fruit! Raspberries, strawberries, or sliced bananas create a delightful burst of flavor and color. Simply layer them on top of the pudding before serving for an Instagram-worthy dessert. You can even blend the fruit into the pudding before chilling for a smooth and fruity twist. If you want to experiment, check out this fruit pudding recipe for inspiration!
Chocolate Vanilla Pudding Twist
For the chocolate lovers out there, try a rich chocolate vanilla pudding twist! Just fold in melted dark chocolate or cocoa powder to your classic vanilla pudding recipe during the cooking process. This results in a deliciously decadent dessert that combines the nostalgic flavors of vanilla with the allure of chocolate. Drizzle some chocolate sauce on top for an extra touch of indulgence.
Cooking tips and notes for Classic Vanilla Pudding
Ensuring the perfect consistency
To achieve the ideal fluffy texture in your classic vanilla pudding, constant whisking is key! As the mixture begins to heat, pay attention to the moment it starts to bubble—this signals it’s time to lower the heat to gently thicken the pudding. If you find your pudding is too thick, a splash of milk can help bring it back to that smooth consistency you desire.
Using fresh vanilla vs. extract
When it comes to flavor, using a fresh vanilla bean can elevate your pudding to a whole new level. Just split the bean and scrape the seeds into your mixture for an intense, aromatic taste. If you don’t have one on hand, good-quality vanilla extract is a convenient substitute. A little goes a long way, so don’t hesitate to experiment with your favorite options for a unique twist!
Serving suggestions for Classic Vanilla Pudding
Creative serving ideas
Elevate your classic vanilla pudding with a touch of creativity! Consider serving it in charming jars for a rustic look, topped with a dollop of whipped cream. For a gourmet twist, infuse your pudding with elements like espresso or citrus zest. Alternatively, layer it in a parfait glass with granola and fresh fruit for a delightful breakfast treat.
Pairing with snacks or desserts
Pairing your classic vanilla pudding with snacks or desserts can enhance the experience. Try it alongside crunchy cookies, like almond or biscotti, for a satisfying textural contrast. You can also serve it with a side of fresh fruit, such as strawberries or blueberries, for a refreshing burst. For an indulgent touch, serve with mini chocolate cakes or even a slice of your favorite pie.
Time Breakdown for Classic Vanilla Pudding
Active Preparation Time
Getting started on your classic vanilla pudding is a breeze! It only takes about 10 minutes of active prep time to whisk your ingredients together and get the mixture on the heat.
Chilling Time
To achieve that delightful creamy texture we all crave, the pudding needs to chill in the refrigerator for at least 2 hours. Patience is key here!
Total Time Required
From start to finish, you’re looking at a total of 2 hours and 10 minutes. Most of that is hands-off time while the pudding cools, so you can use those two hours to plan a perfect dinner or catch up on your favorite series.
Want to learn more about timing in the kitchen? Check out this guide on kitchen time management for some helpful tips!
Nutritional Facts for Classic Vanilla Pudding
Calories Per Serving
Each serving of this delightful classic vanilla pudding contains approximately 240 calories. This makes it a satisfying treat without breaking the calorie bank.
Sugar Content
With around 12 grams of sugar per serving, this pudding strikes a perfect balance between sweetness and indulgence. If you're looking to reduce sugar intake, consider adjusting the recipe to suit your taste.
Health Benefits of Homemade Pudding
Making homemade classic vanilla pudding has its advantages:
- Quality Ingredients: You control what goes into your pudding, using fresh, wholesome ingredients.
- Nutritional Value: Adding whole milk contributes calcium and vitamin D—important for bone health.
- Customization: Enhance your pudding with fruits like raspberries or nuts, adding fiber and healthy fats.
Exploring homemade alternatives can lead to healthier choices—here’s a great resource on the benefits of cooking at home for better nutrition. Plus, satisfying your sweet tooth has never been easier or more rewarding!
FAQ about Classic Vanilla Pudding
Can I make this pudding dairy-free?
Absolutely! You can easily adapt the classic vanilla pudding recipe to be dairy-free. Simply replace the whole milk with a plant-based milk like almond, coconut, or oat milk. Just be mindful that different types of milk might slightly alter the flavor and consistency, but you’ll still end up with a delicious pudding!
How long can I store leftovers?
If you have any leftover classic vanilla pudding, you're in luck! It can be stored in an airtight container in the refrigerator for up to three days. Just remember to cover the surface with plastic wrap to prevent a skin from forming.
What if my pudding doesn't thicken?
If your pudding doesn’t thicken as expected, don’t worry; it’s a common issue! This can happen if the mixture wasn’t cooked long enough or if it wasn’t whisked thoroughly. To troubleshoot, simply return it to the heat and whisk constantly until it reaches the desired consistency. For more detailed tips, check out this helpful resource.
Conclusion on Classic Vanilla Pudding
Why you should try making it today
Classic vanilla pudding is a nostalgic treat that's quick to whip up and even easier to enjoy. With minimal ingredients and a straightforward process, it’s perfect for weeknight desserts or special occasions. Plus, nothing compares to the creamy, homemade goodness that elevates any everyday meal. Why not indulge today?
Classic Vanilla Pudding: Easy, Creamy Delight for Everyone
Equipment
- Medium saucepan
- whisk
- medium bowl
- plastic wrap
Ingredients
Pudding Base
- 2 cups whole milk
- ⅓ cup granulated sugar
- 2 tablespoons cornstarch
- ¼ teaspoon kosher salt
- 4 tablespoons unsalted butter (2 ounces)
- 1 teaspoon vanilla extract
- 1 (2-inch) vanilla bean split lengthwise (optional)
Garnish (optional)
- ½ cup raspberries optional
- ¼ cup sliced almonds optional
Instructions
Preparation
- In a medium saucepan, combine milk, sugar, cornstarch, salt, butter, vanilla extract, and vanilla bean. Whisk until cornstarch is dissolved and the mixture is smooth.
- Place saucepan over medium heat and cook, whisking constantly, until mixture just begins to bubble, about 6 minutes. Immediately reduce heat to low and simmer, whisking constantly, until mixture thickens and is glossy, 1 to 2 minutes.
- Transfer pudding to a medium bowl and place a piece of plastic wrap directly onto surface of pudding. Refrigerate until chilled, at least 2 hours.
- When ready to serve, remove vanilla bean and whisk pudding to get rid of any clumps. Divide mixture between 2 bowls and garnish with raspberries and sliced almonds, if desired.

Leave a Reply