
Introduction to PB&J Ice Cream Sandwiches
Why PB&J Ice Cream Sandwiches are a Game Changer
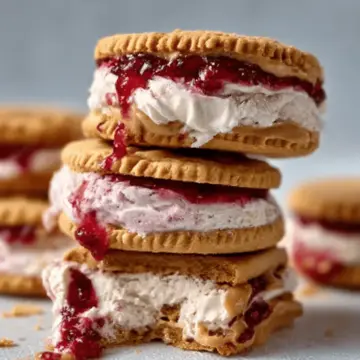
Ah, the classic PB&J—a beloved childhood staple that holds a special place in many of our hearts. Now, imagine taking that nostalgia and giving it a delicious upgrade: enter the PB&J Ice Cream Sandwich! This delightful twist not only brings back memories of carefree summer days but also introduces a new way to enjoy two favorites in one bite.
These sandwiches are a game changer for several reasons. First, they combine the creamy richness of peanut butter with the refreshing sweetness of strawberry ice cream, creating a flavor explosion that’s hard to resist. Plus, the cookie base is gluten-free, allowing everyone to indulge without worries. The added crunch of crushed peanuts and the burst of flavor from freeze-dried strawberries elevate this treat to gourmet status.
Whether you're hosting a summer gathering, looking for a fun dessert to enjoy mid-week, or simply wanting to impress your friends, these PB&J Ice Cream Sandwiches are your go-to dessert. They’re easy to make, and each bite offers a delightful combination of textures and flavors that will bring smiles to everyone around. So, roll up your sleeves and get ready to craft this irresistible treat! Want to dive into the full recipe? Let’s get started!

Ingredients for PB&J Ice Cream Sandwiches
Essential ingredients
Creating the perfect PB&J Ice Cream Sandwiches starts with some core ingredients that blend nostalgia with indulgence:
- Peanut Butter: The star! Choose a creamy, unsalted version to get that rich flavor.
- Grass-fed Butter: Adds a delicious richness to your cookie base.
- Maple Syrup: A touch of sweetness that pairs beautifully with peanut butter.
- Vanilla Extract: This elevates the flavor profile and gives warmth to your cookies.
- Gluten-free Flour: Ensures a chewy cookie texture while accommodating dietary preferences.
- Strawberry Ice Cream: The quintessential jelly element that brings your sandwich to life.
Optional additions
Once you've gathered the essentials, consider these fun options to elevate your PB&J Ice Cream Sandwiches:
- Melted Dark Chocolate: Drizzling this on your sandwich adds a decadent finish.
- Crushed Peanuts: Sprinkle them for added crunch and flavor.
- Freeze-dried Strawberries: They enhance the strawberry taste while adding visual appeal.
Feel free to mix and match! These additions can make each bite even more delightful. Plus, you can find these ingredients easily online or at your local store, ensuring you have everything for a fun kitchen adventure!
Step-by-step preparation for PB&J Ice Cream Sandwiches
Crafting your PB&J Ice Cream Sandwiches isn’t just about following the steps; it’s about enjoying the process! Let’s dive into the delightful preparation, ensuring you savor every moment.
Prepare your baking sheet
Start this delicious journey by preparing your baking sheet. Grab a 10x15-inch rimmed baking sheet and line it with parchment paper. This step is crucial as it prevents your cookie layers from sticking, making it easier to lift them later. A quick tip: crumple the parchment paper before laying it on the baking sheet; this makes it easier to fit!
Mix the core ingredients
Next, let’s create a scrumptious base for our cookies. In a medium bowl, combine your flax egg, peanut butter, melted grass-fed butter, maple syrup, and vanilla extract. Whisk them together until the mixture is smooth and creamy. Not only will the peanut butter provide that amazing flavor, but using grass-fed butter can enhance the richness in your cookies. If you’re curious, check out why grass-fed is often seen as the healthier choice here.
Create the cookie dough
Now it’s time to form that irresistible cookie dough. Gradually stir in your gluten-free flour and a pinch of salt into the wet mixture until a cohesive dough forms. Make sure not to overmix; just enough to bring it all together. The dough should feel soft but workable, setting the perfect foundation for your ice cream sandwiches.
Freeze and cut your cookie layers
Here's where the magic happens. Transfer the cookie dough onto your prepared baking sheet, pressing or rolling it out to create a ¼-inch thick rectangle. Once shaped, slide it into your freezer for at least 40 minutes. This step not only firms up the dough but also makes cutting easier. After freezing, cut the dough in half vertically to create two equal layers—these will be the delightful “bread” for your sandwiches.
Assemble your ice cream sandwiches
With your cookie layers ready, it’s time to put everything together! Spread a generous amount of strawberry ice cream evenly over one half of your frozen peanut butter cookie dough. Gently place the other half on top, forming a glorious sandwich. For that extra crunch, feel free to sprinkle some crushed peanuts or freeze-dried strawberries on the ice cream before placing the top layer down!
Finally, return your assembled sandwiches to the freezer and allow them to set for at least 2 hours. When you’re ready to savor them, simply cut into squares or bars.
And there you have it—your very own homemade PB&J Ice Cream Sandwiches, a delightful twist on a classic treat that’s sure to impress. Happy indulging!

Variations on PB&J Ice Cream Sandwiches
Nut Butter Alternatives
While traditional PB&J ice cream sandwiches star peanut butter, don't hesitate to play with nut butter alternatives! Almond, cashew, or even sunflower seed butter can deliver unique flavors that pair wonderfully with ice cream. If you have nut allergies or want a twist on tradition, sunflower seed butter offers a rich, creamy consistency that’s both safe and delicious. Interested in exploring different options? Check out this guide to nut butters.
Different Ice Cream Flavors
Why limit yourself to strawberry when making your PB&J ice cream sandwiches? Venture into flavors like creamy vanilla, chocolate, or even fruity sorbets for a refreshing twist! For a decadent experience, try swirls of caramel or cookie dough ice cream. This simple change can transform your sandwiches into a trendy dessert that delights your taste buds. You might even want to experiment with homemade ice creams—check out some easy ice cream recipes to get inspired!
Cooking tips and notes for PB&J Ice Cream Sandwiches
Best practices for freezing
To ensure your PB&J Ice Cream Sandwiches maintain their delicious texture, freeze them in an airtight container or wrap them individually. This prevents freezer burn and helps keep them fresh for up to a month. If you're in a rush, slice them before they fully freeze so that you can enjoy a sweet treat anytime!
Ingredient substitutions
Feel free to get creative with your ingredients! If you’re not a fan of strawberry ice cream, any flavor will work, such as vanilla or chocolate. For a nut-free version, opt for sun butter or a similar allergen-friendly spread. If gluten is a concern, using a gluten-free flour blend—like the ones found at Bob’s Red Mill—is a great alternative that won’t compromise on taste!

Serving Suggestions for PB&J Ice Cream Sandwiches
Creative Ways to Serve
Elevate your PB&J Ice Cream Sandwiches presentation by serving them on a rustic wooden board or a colorful plate. You can also cut them into fun shapes using cookie cutters for a whimsical touch—perfect for parties or gatherings. For an extra flair, consider drizzling melted dark chocolate over the top and sprinkling crushed peanuts for a crunchy finish.
Pairing with Toppings
To complement the creamy richness of your PB&J Ice Cream Sandwiches, try adding fresh fruit like sliced bananas or berries on the side. A dollop of whipped cream can also be a delightful addition. If you’re looking for a beverage pairing, a tall glass of cold almond milk or a refreshing iced herbal tea works beautifully to balance the sweetness. You can find some great herbal tea options here for a perfect pairing!
Time Breakdown for PB&J Ice Cream Sandwiches
Preparation Time
Getting ready for these delicious PB&J Ice Cream Sandwiches takes about 20 minutes. This includes mixing the peanut butter and other ingredients, shaping the dough, and prepping the baking sheet.
Freezing Time
Patience is key! After preparing, you'll need to freeze your sandwiches for at least 2 hours. This helps them firm up so you can enjoy that perfect ice cream bite.
Total Time
In total, expect to dedicate around 2 hours and 20 minutes from start to finish. It’s a small investment for a treat that combines nostalgia with a satisfying crunch. Trust me, the wait is absolutely worth it!
For even more kitchen inspiration, check out VitaCost’s extensive collection of baking ingredients to make your experience smooth and enjoyable!
Nutritional Facts for PB&J Ice Cream Sandwiches
Calories
Each PB&J Ice Cream Sandwich packs approximately 250 calories, making it a delightful yet indulgent treat. Balancing satisfaction with nutrition is key, especially when you're craving a sweet snack!
Protein
With the help of creamy peanut butter, you'll enjoy around 7 grams of protein per sandwich. This makes it a great option for refueling after workouts or simply enjoying a mid-day pick-me-up.
Sugar Content
You'll find about 18 grams of sugar in each sandwich, a tasty mix derived from the maple syrup and strawberry ice cream. While it curbs those sweet cravings, consider balancing it with nutritious choices throughout your day.
If you're interested in higher protein options, explore alternatives like nuts or Greek yogurt as tasty fillings. For even more insights into your favorite ingredients, check out the benefits of peanut butter from the American Peanut Council.
Feel free to experiment with healthier ice cream brands that offer lower sugar content without sacrificing flavor!
FAQs about PB&J Ice Cream Sandwiches
Can I use store-bought cookie dough?
Absolutely! If you’re short on time or just want to simplify the process, store-bought cookie dough is a fantastic option. Look for a peanut butter or chocolate chip variety to complement the flavors of your PB&J ice cream sandwiches. Just ensure it’s thick enough to hold your ice cream without falling apart.
How do I store leftovers?
If you find yourself with any leftover PB&J ice cream sandwiches, you can store them in an airtight container in the freezer. They should last for about a week. Just layer them with parchment paper to prevent sticking and make it easy to grab a quick dessert whenever the mood strikes!
What are some fun toppings to try?
Get creative with toppings! Here are a few ideas to elevate your PB&J ice cream sandwiches:
- Crushed cookies for extra crunch
- Sprinkles for a fun, colorful touch
- Drizzled chocolate or caramel sauce for added sweetness
- Chopped nuts, like almonds or walnuts, for a nutty flavor
Mix and match to find your perfect combination!
Conclusion on PB&J Ice Cream Sandwiches
In summary, PB&J Ice Cream Sandwiches are the ideal treat to satisfy your sweet cravings while evoking nostalgic childhood memories. Easy to prepare, these delightful sandwiches combine smooth peanut butter, creamy strawberry ice cream, and a hint of chocolate. Try them out and enjoy a delightful twist on a classic favorite!
PB&J Ice Cream Sandwiches
Equipment
- Baking sheet
- Parchment paper
- Mixing bowl
Ingredients
Base
- ½ cup peanut butter
- 1.4 cup grass-fed butter
- ½ cup maple syrup
- 2 teaspoon vanilla extract
- 1 ¾ cups gluten-free flour
Fillings
- 1 pint strawberry ice cream
- 1 bar dark chocolate melted
- 1 cup peanuts crushed
- 1 cup freeze-dried strawberries
Instructions
Preparation Steps
- Line 10x15-inch rimmed baking sheet with parchment paper.
- In medium bowl, whisk together the flax egg, peanut butter, melted butter, maple syrup and vanilla until smooth.
- Stir in gluten-free flour and salt until dough forms.
- Transfer dough to parchment-lined baking sheet. Press or roll the dough into a ¼-in thick rectangle. Freeze for at least 40 minutes.
- Cut cookie dough in half vertically so you have two equal layers.
- Spread strawberry ice cream evenly over one half of frozen peanut butter cookie dough. Gently place other half of cookie dough on top to form sandwich.
- Freeze bars for at least 2 hours to firm up.
- Remove from the freezer and cut into squares or bars.
Leave a Reply