
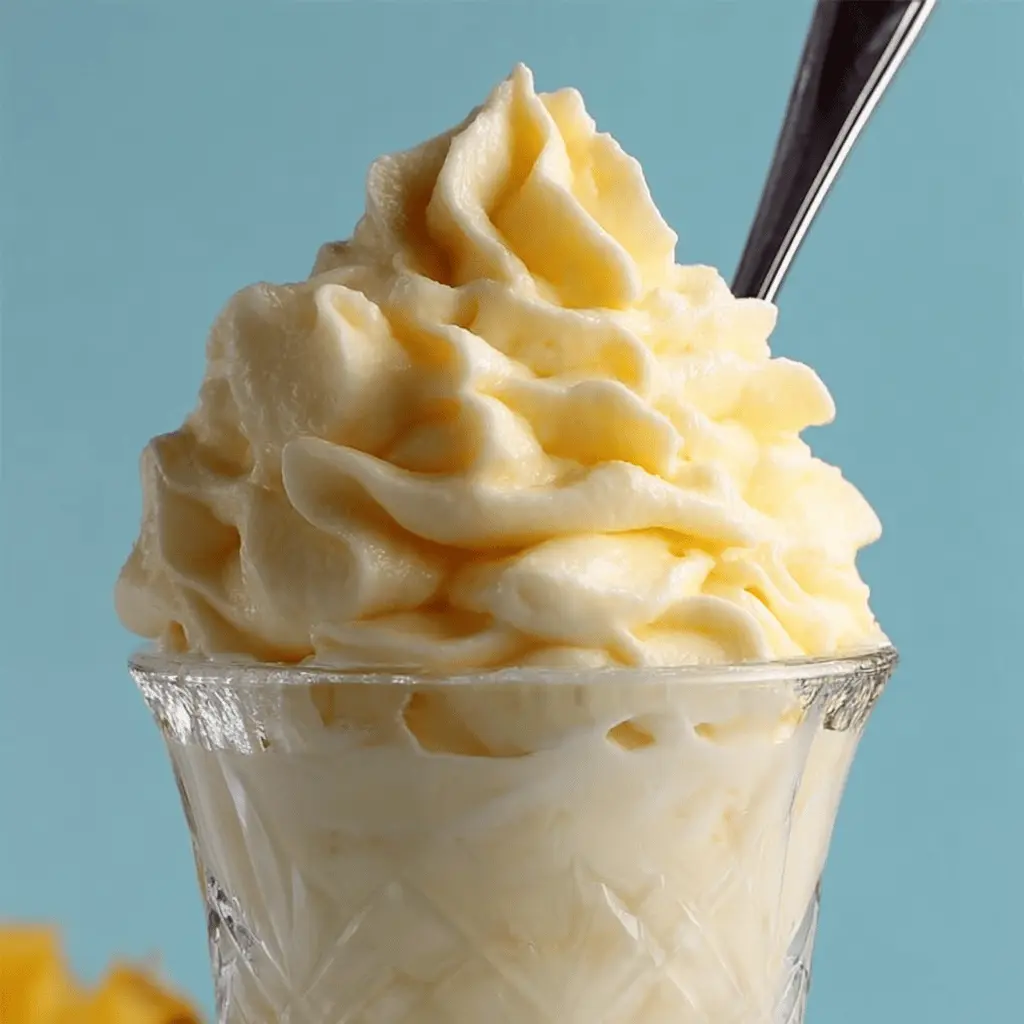
Introduction to Pineapple Whip
If you're searching for a refreshing and delightful treat to make at home, look no further than Pineapple Whip. This simple yet satisfying dessert is not only easy to whip up, but it's also a healthier alternative to traditional ice cream, allowing you to indulge without the guilt. Imagine the sweet and tangy flavor of fresh pineapple blended into a creamy texture that melts in your mouth—all in just a few minutes!
Why you’ll love making Pineapple Whip at home
Creating your own Pineapple Whip provides a unique opportunity to control the ingredients and tailor the flavor to your liking. With just four main ingredients, you can whip up a batch that rivals any fancy café, or even your favorite theme park treat! The best part? You can adjust the sweetness by adding more or less maple syrup, depending on your preferences.
Imagine serving this tropical delight at your next gathering or enjoying it on a hot summer day—it's sure to impress! Plus, you can easily modify it to fit your dietary needs. For a creamier option, try using full-fat coconut milk; for a lighter version, almond milk works perfectly. Whether you’re planning a backyard BBQ or simply looking to treat yourself, this Pineapple Whip will surely bring a smile to your face.

Ingredients for Pineapple Whip
The magic of frozen pineapple
Using frozen pineapple is the secret to achieving that wonderful creamy texture in your Pineapple Whip. Frozen fruit not only helps to make the blend smooth and cold but also locks in the juicy sweetness of fresh pineapple, which can elevate your treat to a tropical paradise in a bowl. Plus, it's super convenient—no peeling or chopping required!
Choosing the right milk: Almond or coconut?
When it comes to the milk for your Pineapple Whip, both almond and coconut milk offer unique flavors and textures. Almond milk is great if you prefer a lighter, nutty nuance. On the other hand, opting for coconut milk, especially the full-fat version, lends a creamier feel and an irresistible piña colada vibe. Just be sure to balance it; you may need to adjust the amount of milk slightly if you choose coconut!
The role of maple syrup in Pineapple Whip
Maple syrup adds a touch of sweetness that perfectly complements the tartness of the pineapple. Just a tablespoon enhances the flavor without overpowering the fruit's natural sugars. If you're interested in alternatives, consider checking out various natural sweeteners for a twist on the classic taste!
Preparing Pineapple Whip
Thawing the frozen pineapple
To kick off your Pineapple Whip adventure, it's essential to get your frozen pineapple in prime condition. Start by allowing the bag of frozen pineapple to thaw on your kitchen counter for about 20 minutes. This slight warming will make it easier to blend, helping those juicy chunks break down smoothly without adding excess liquid. It’s a little waiting game that pays off in creamy goodness! While you wait, you can gather and measure the rest of the ingredients. Having everything ready will streamline the process and make you feel like a pro in the kitchen.
Measuring and adding ingredients to the blender
Now that your pineapple has softened a bit, it’s time to bring everything together. Grab your blender and measure out the following ingredients:
- ½ cup of orange juice for a burst of citrusy goodness
- ½ cup of almond or coconut milk, depending on your preference
- 1 tablespoon of maple syrup to sweeten the mix
Add the thawed pineapple, orange juice, chosen milk, and maple syrup to the blender. Ensure you secure the lid tightly—trust me, you don’t want a fruity explosion in your kitchen!
Blending to perfection
Here comes the fun part! Blend all those ingredients together until you achieve that thick, creamy consistency you’re after. Depending on your blender's power, this might take a minute or two. If you have a tamper, it can be a handy tool here to help push those ingredients down into the blades. If not, don’t worry—just stop the blender occasionally to scrape down the sides. You want to ensure that every last piece of pineapple gets blended in for that signature Pineapple Whip flavor!
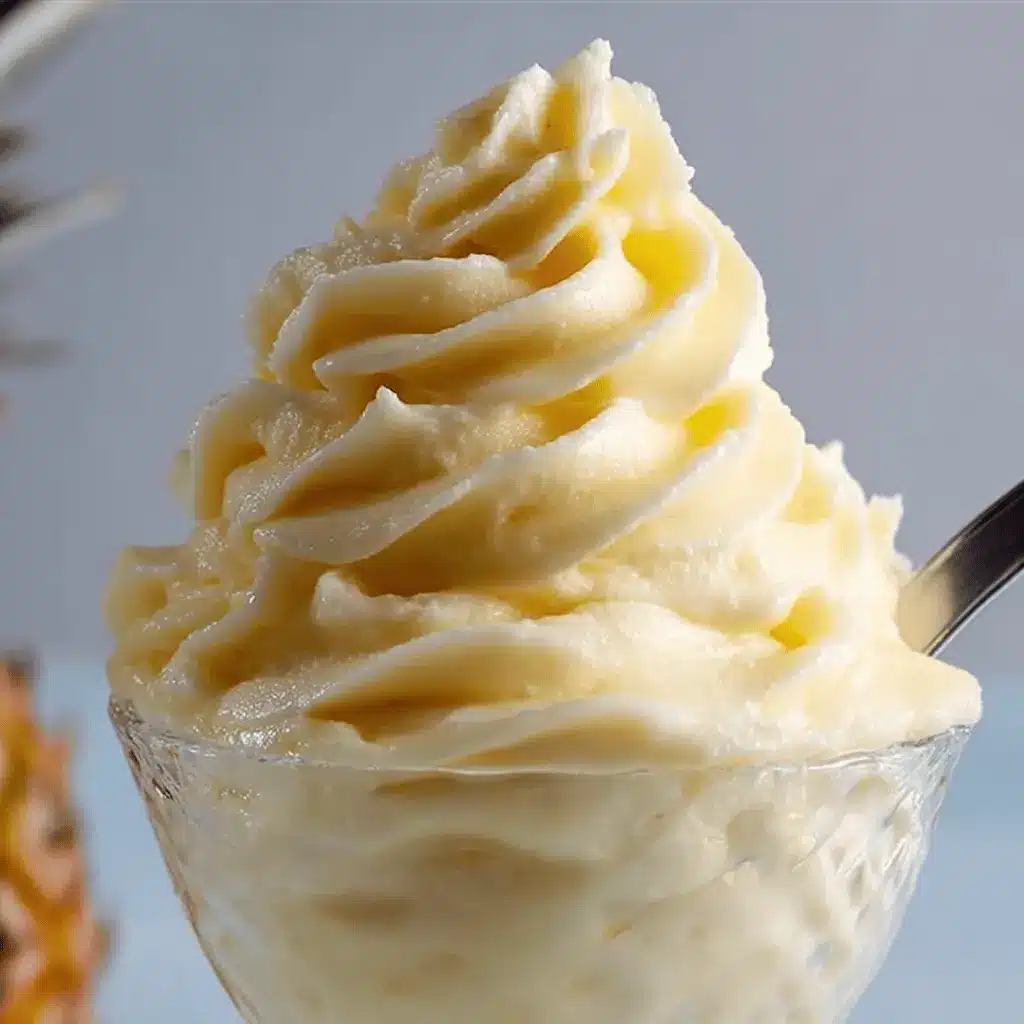
Serving directly or freezing for a soft-serve texture
Once your mixture is beautifully creamy, you can go for two serving styles. If you can’t wait, simply scoop the Pineapple Whip into a bowl and enjoy it right away! It's a refreshing treat that’s hard to resist.
For a firmer, soft-serve style, transfer the blended whip into a gallon-sized zipper bag. Flatten it out as much as possible and seal it. Pop it in the freezer for about 30 minutes. This allows the whip to firm up just enough to give you that perfect soft-serve texture without melting too quickly. It’s like a tropical retreat in a bowl, just waiting for you to dive in!
So, gather your ingredients and prepare to embark on a deliciously tropical journey with your homemade Pineapple Whip. Enjoy the bright, sunny flavors and impress your friends at your next gathering!
Variations on Pineapple Whip
Tropical Twist with Additional Fruits
Why not explore a tropical paradise with your Pineapple Whip? Toss in some frozen mango or banana for a delightful fusion of flavors! You might even consider adding a handful of frozen strawberries or kiwi to enhance the sweetness and texture. Mixing in these fruits not only brightens up your whip but packs in extra vitamins and antioxidants! For more inspiration, check out this guide on fruit combinations from Healthline.
Healthy Swaps for a Dairy-Free Version
If dairy isn’t your thing, fear not! You can swap almond milk for coconut milk, which brings a creamier consistency and a hint of tropical flavor that complements the pineapple beautifully. If nut allergies are a concern, try oat or soy milk as alternative bases. These substitutions keep your Pineapple Whip deliciously creamy and entirely plant-based! Plus, who wouldn’t want a guilt-free treat that’s as delightful as it is healthy? Want to learn more about dairy alternatives? Visit Choosing Nutrition.
Cooking tips for Pineapple Whip
Troubleshooting blending issues
If your Pineapple Whip is struggling to blend smoothly, don’t panic! Sometimes, frozen fruit can be tough on blenders. Try adding a bit more liquid, like almond or coconut milk, to help it along. If you have a tamper tool, use it to push the ingredients down while blending. Stop occasionally to scrape the sides, ensuring everything gets blended to perfection.
Achieving the perfect consistency
To get that creamy, soft-serve consistency, let the Pineapple Whip chill in the freezer for about 30 minutes after blending. This step is crucial for enhancing texture. If it’s too thick after freezing, simply blend in a splash of juice or milk until you reach your desired creaminess. Enjoy your refreshing treat!
For more blending tips, you can check out this helpful guide on smoothie making from the Food Network.
Serving suggestions for Pineapple Whip
Pairing with fruit or granola toppings
Elevate your Pineapple Whip experience by adding a medley of fresh fruit or crunchy granola toppings. Try sprinkling diced mango, kiwi, or strawberries over the top for a burst of color and flavor. Alternatively, a handful of toasted coconut flakes or granola can add a delightful crunch, making for a perfect snack or dessert. Did you know that incorporating fiber-rich toppings can boost the nutritional value of your treat? It's a sweet way to satisfy your cravings while keeping it wholesome.
Creative serving dishes for Pineapple Whip
Presentation can make all the difference! Serve your Pineapple Whip in fun and creative dishes like hollowed-out pineapple halves or coconut shells for a tropical vibe. You could even use mason jars for a chic touch—just layer the whip with your favorite fruits for a visually appealing dessert. If hosting friends or family, consider using mini cups for individual servings, making it easy for guests to grab and enjoy. The right serving dish can enhance the overall experience, turning a simple treat into a delightful occasion.
Time Details for Pineapple Whip
Preparation time
Before you dive into creating your delicious Pineapple Whip, set aside about 20 minutes to thaw your frozen pineapple. This simple step makes blending a breeze, ensuring a smooth consistency.
Blending time
Once your pineapple is ready, the blending process will take roughly 5 to 10 minutes. Just keep an eye on the texture, and stop to scrape down the sides when needed for an ultra-creamy result.
Total time
All in, you'll spend about 30 to 35 minutes from start to finish! That's pretty quick for such a refreshing treat, making it an excellent choice for last-minute snacks or impressing guests. Enjoy every heavenly spoonful!
For tips on getting the best results with frozen fruits, check out this guide from Food Network.
Nutritional Information for Pineapple Whip
Calories per serving
A serving of this refreshing Pineapple Whip packs about 59 calories. It’s a guilt-free treat that fits nicely into various dietary plans, making it a perfect choice for a light dessert or snack.
Key vitamins and minerals
This delightful dessert isn’t just delicious; it’s also nutritious! Each serving of Pineapple Whip offers a boost of essential vitamins and minerals, including:
- Vitamin C: 46 mg, which supports a healthy immune system.
- Vitamin A: 85 IU, essential for eye health.
- Calcium: 41 mg for strong bones.
- Potassium: 131 mg, helping to maintain proper muscle function.
By choosing this Pineapple Whip recipe, you’re treating your taste buds while nourishing your body with wholesome nutrients. For more detailed insights into the benefits of these vitamins, check out resources from the Harvard T.H. Chan School of Public Health. Enjoy your healthy indulgence!
FAQs about Pineapple Whip
What other flavors can I mix with Pineapple Whip?
While Pineapple Whip is delicious on its own, you can enhance its flavor by blending in other ingredients. Consider adding:
- Mango: A tropical twist that's super refreshing.
- Banana: For a creamy, smooth texture that’s naturally sweet.
- Coconut: Use full-fat coconut milk for that piña colada vibe.
- Berries: Strawberries or blueberries can add a burst of color and flavor.
Feel free to experiment and create your own unique blends!
How long can I store the Pineapple Whip?
You can store your Pineapple Whip in an airtight container in the freezer for about one week. Just remember that, after some time, it may become more solid. If that happens, let it sit at room temperature for a few minutes before scooping.
Is it possible to make Pineapple Whip without a blender?
Yes, indeed! If you don't have a blender, you can use a food processor or even a simple mixing bowl with a sturdy masher. Just remember that the texture may not be as smooth, but it will still taste amazing. Using frozen fruit helps because it mashes easier, making it a fun manual cooking experience!
Conclusion on Pineapple Whip
In conclusion, Pineapple Whip is a deliciously refreshing treat that's easy to make and perfect for any occasion. With just a few simple ingredients, you can whip up a creamy dessert that’s dairy-free and oh-so-satisfying. Enjoy it on a hot day or as a fun snack! For more tasty recipes, check out this resource for inspiration!

Pineapple Whip
Equipment
- blender
Ingredients
Frozen Ingredients
- 1 pound frozen pineapple
- ½ cup orange juice
- ½ cup almond or coconut milk (see notes)
- 1 tablespoon maple syrup
Instructions
Preparation Steps
- Start by letting the bag of frozen pineapple thaw on the counter for 20 minutes.
- Add the pineapple to the blender with the other ingredients, secure the lid, and blend until the mixture looks thick and creamy.
- You can serve the pineapple whip right away or transfer it to a gallon-sized zipper bag and freeze for 30 minutes for a firmer texture.


Leave a Reply